Showing posts with label Tricks. Show all posts

Tuesday, March 17, 2009

Tired of chasing your mouse? Use keyboard shortcuts


The mouse, one of the greatest advances in computing history, provides you with an intuitive point-and-click method for using your computer. Depending on the type of work you're doing, however, sometimes using a mouse actually slows you down. If you are a good typist, taking your hands away from the keyboard to move the mouse can use up a few seconds. Over the course of a full day, you could save several minutes by using keyboard shortcuts instead of the mouse.

You can use your keyboard instead of your mouse to do these three tasks:


Start a program using a keyboard shortcut

The Start menu is great for finding programs, but its multiple levels of folders can be time consuming to navigate. If there is a program you start frequently, you should set a keyboard shortcut for it so that you can start the program without taking your hands off the keyboard.

To set a keyboard shortcut to start a program

1.

Click the Start menu, and then click All Programs. Right-click the program that you want to start with a keyboard shortcut, and then click Properties.

Shortcut menu for a program with Properties selected

2.

Click in the Shortcut key box. Now press the letter on your keyboard that you want to use to start the program. Make it easy to remember—for example, press I for Microsoft Internet Explorer.

Note: You can use either uppercase or lowercase letters when creating your keyboard shortcuts—and when accessing them later. In the Shortcut key box, Microsoft Windows XP automatically adds Ctrl + Alt + before the key you pressed. When you want to start the program, hold down both the CTRL and ALT keys simultaneously, while also pressing the letter you chose. This way, your program won't start every time you type that letter.

Properties window for specified program with Shortcut tab displayed and Shortcut key box indicated

3.

Click OK.

Properties window for specified program with Shortcut tab displayed and OK button selected

4.

Now test your shortcut. Hold down the CTRL and ALT keys, and then press the letter you chose. If you find it difficult to hold down two keys at once, read Turn on the Sticky Keys feature. Your program should start.

Pressing shortcut keys

When your friends see you start up programs without touching your mouse, they just might think you have a psychic connection with your computer!

Navigate menus using the keyboard

You can speed up tasks in almost any program by choosing menu items using your keyboard instead of your mouse. This operation is particularly handy when you're performing repetitive tasks.

To control menus using your keyboard

1.

With your program open, press the ALT key. Notice that one letter on each menu name is now underlined. To open the menu, press the underlined key. For example, in Internet Explorer, the View menu name shows the V underlined after you press the ALT key. To open the View menu, press the ALT key, and then press V.

Menu bar with the V highlighted and underlined on View menu name

2.

Now, each menu item will show one letter underlined. To access or activate the menu item you want, simply press the underlined key. For example, in Internet Explorer, after you open the View menu, the Privacy Report menu item shows the V underlined. Instead of clicking Privacy Report with your mouse, you can just press the V key.

View menu with the v in Privacy Report menu item highlighted and underlined

3.

You can also choose menu commands by pressing key sequences quickly, without waiting for the menus to open. For example, to quickly view a Web page's privacy report in Internet Explorer, press ALT, V, V. Similarly, to save a Web page in Internet Explorer, you would normally click the File menu, and then click Save As. To choose the same commands using your keyboard, press ALT, F, A.

Control windows using your keyboard

If you like to keep four or five windows open while you work (or play) on your computer, you'll appreciate knowing these keyboard shortcuts. You can quickly switch between your Web browser, e-mail, instant message windows, and other programs without taking your hands off the keyboard.

ActionShortcut

Minimize a window to your taskbar

ALT, SPACEBAR, N

Maximize a window so it takes up your whole desktop

ALT, SPACEBAR, X

Restore a window so it's visible but doesn't take up your whole desktop

ALT, SPACEBAR, R

Close a window

ALT+F4

Switch to the last window you had open

ALT+TAB

Switch to any window

Hold down the ALT key, and press TAB until the window you want is active

Programs often start up in a "restored" state, where the window takes up only part of the screen. To maximize the window so that it takes up the entire screen, press the ALT key, press the SPACEBAR, and then press X. This will feel natural after you do it a few times, and you will feel much more efficient while using your computer.

5 useful Windows XP tricks

You know that feeling you get when your friends or family see you do something on your computer that they've never seen before?

If you haven't had this opportunity, here's where you start.

If you have, then you know that you're feeling like the world's coolest power-user when this happens. Knowledge is power! Here are five Windows XP tips that will get you/keep you schoolin' your friends and family.

Don't just maximize your windows—go full screen

When you need a really big window, don't just maximize it: go full screen! To view a window full screen, hold down the Ctrl key and double-click the window's title bar—or when the window is active, press the F11 key at the top of your keyboard—to get the biggest window possible.

Full-screen screenshot

Add the Links toolbar to My Computer

You know what would make a great toolbar? One where you could put your favorite applications and documents so that you could open them from any window at any time. Guess what? You can and here's how: click Start, then My Computer. Now right-click the toolbar and then click Links. You now have the Links toolbar on your windows, just like in Internet Explorer. Note: Make sure that Lock the Toolbars is not checked. Click on it to deselect it if it is.

The really cool thing about the Links toolbar is that it's completely customizable. Try this: Navigate to your favorite application and drag and drop its icon to the Links toolbar. You just created a shortcut. Do this again and again for as many applications as you want to appear on the toolbar.

Links toolbar screenshot

Arrange windows on your desktop

You can display any two windows side by side on the desktop by first clicking a window's button on the Taskbar. Next, press and hold the Ctrl key and right-click the second window that you want to open, then click Tile Vertically. This works great when you want to view two Microsoft Word or Microsoft Internet Explorer windows at the same time.

Tile Vertically screenshot

Organize your files into groups

Organize your files by grouping them. Try this: Open a folder containing several different subfolders and file types. Right-click any empty space on the window's contents pane, click Arrange Icons By, and then click Show in Groups. To arrange the window's contents, right-click again in any empty space on the window's contents pane, point to Arrange Icons By, and click Name, Size, Type, or Modified.

Arrange Icons By screenshot

Make your own icons

It's shockingly easy to create your own icons in Windows XP. Let's do it: Click Start, click All Programs, click Accessories, and then click Paint. On the Image menu, click Attributes. Type 32 for both the Width and Height of the document, and make sure that Pixels is selected under Units. Click OK to create a new 32x32-pixel document: the size of an icon.

Now add type, color, or do whatever you'd like to your image. I like to shrink photos (headshots work best) to 32x32 and simply paste them into my Paint document. When you're finished, open the File menu and click Save As. Use the dialog box to choose where you want to save your file, then give it a name followed by ".ico" (without the quotes), and click Save. (The extension ".ico" tells Windows that it's an icon file.) You just created an icon! Now you can change any shortcut or folder to your own icon—just browse to it on your hard drive.

Attributes screenshot

These tips are from the book, Windows XP Killer Tips by Kleber Stephenson, ISBN 073571357X. Published here with the permission of Pearson Education, Inc.

Monday, February 9, 2009

Enable Multiple Concurrent Remote Desktop Connections or Sessions in Windows XP

Windows XP Professional and Windows XP Media Center Edition (MCE) has Remote Desktop (RDP) service that allows the computer to be remotely connected, accessed and controlled from another computer or host. However, Windows XP machine only allows one concurrent remote desktop connection from a single user been connected to it with no multiple remote desktop sessions or connections support.

Whenever there is a remote user who user Remote Desktop Connection (RDC) client to connect to a Windows XP host, the local user is disconnected with the local console screen locked, with or without his or her permission. Remote Desktop, unlike Terminal Server Services in Windows 2000, Server 2003 and Server 2008, is designed for single user use only, no matter it’s local or remote user.

Here’s a hack to unlock the single user limitation and enable multiple concurrent remote desktop connection sessions support in Windows XP Professional and Media Center Edition, using a either a patched termserv.dll or old patched cracked termserv.dll build version version 5.1.2600.2055, so that unlimited users can simultaneously connect to a computer via Remote Desktop.

1. Download a copy of patched termsrv.dll (in ZIP file) which has the Remote Desktop connection limitation deactivated for your version of Windows XP:

Windows XP RTM, SP1 and SP2: termsrv.dll (version 5.1.2600.2055)
Windows XP SP2: termsrv.dll (version 5.1.2600.2180)
Windows XP SP3: termsrv.dll (version 5.1.2600.5512)

For information, the termsrv.dll patch normally has the following HEX code bits overwritten with following value:

00022A17: 74 75
00022A69: 7F 90
00022A6A: 16 90
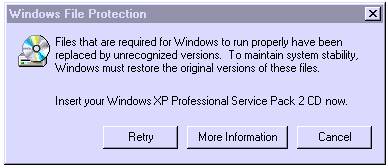
2. Restart the computer and boot info Safe Mode by pressing F8 during initial boot up and select Safe Mode. This step is only required if you’re currently running Windows Terminal Services or Remote Desktop service, and System File Protection has to be skipped and bypassed, else it will prompt the following error message to restore the original termsrv.dll.

Windows File Protection

read more...


Trick to Enable and Allow Windows XP and Vista Remote Desktop Login Without Password (or With Blank Null Password)

When attempting to connect or establish Remote Desktop connection to a remote Windows XP or Windows Vista computer in order to remotely logon to the machine, the log on may be rejected with Remote Desktop client returns one of the following error messages.

Your credentials did not work.

or,

Unable to log you on because of an account restriction.

By default, Windows XP and Windows Vista does not allow nor permit user account without password set or user name with blank (null) password to connect and log in remotely via Remote Desktop Protocol (RDP).

The obvious resolution is definitely to create and set a password for the user account that requires to logon remotely to a computer via Remote Desktop, and it’s recommended for security reason too. However, user who for some reason such as for the purpose of convenient, and thus unable or cannot assign a password to the user account, can use the following workaround to allow user to login remotely via Remote Desktop Connection (RDP) client to Windows XP and Windows Vista PC.

How to Enable Remote Login via Blank Passwords using Local Security Policy or Group Policy Editor

The configuration to enable null (blank) passwords logon must be done on the host computer, i.e. the remote computer to remotely controlled. To configure the Remote Desktop host computer to accept user name with blank password, go to Control Panel -> Administrative Tools (Under System and Maintenance in Windows Vista) -> Local Security Policy. Alternatively, run GPEdit.msc (Group Policy Editor).

Then, expand Security Policies -> Local Securities -> Security Options (for user using Group Policy Editor or GPEdit.msc, expand Local Computer Policy -> Computer Configuration -> Windows Settings -> Security Settings -> Local Policies -> Security Options). Locate Accounts: Limit local account use of blank passwords to console logon only policy, and set its value to Disabled.

Allow Remote Desktop Connection via User with Blank Passwords


Allow Remote Desktop Connection via User with Blank Passwords

Once disabled, user account with blank or null passwords can now login remotely instead of just able to do so via local console.

How to Configure Blank Passwords Allowed for Remote Log On via Registry

Windows XP and Windows Vista stores the value of the policy set above in a registry key named “LimitBlankPasswordUse”. To unlock the limitation of cannot establish Remote Desktop logon with user account without a password, simply set the value data for LimitBlankPasswordUse to 0 (so that there is no limit on blank or null password use), as according to the code below. Alternatively, copy and paste the following text to a text file, and save with a .reg extension. Then run the .reg file to merge the value to registry.

Windows Registry Editor Version 5.00

[HKEY_LOCAL_MACHINE\SYSTEM\ControlSet001\Control\Lsa]
“LimitBlankPasswordUse”=dword:00000000

[HKEY_LOCAL_MACHINE\SYSTEM\CurrentControlSet\Control\Lsa]
“LimitBlankPasswordUse”=dword:00000000

For convenient, two registry files have been created and available for free download, which will enable or disable usage of blank password (or absent of password) to login remotely. Download BlankPasswords.zip and run EnableBlankPasswords.reg to enable or DisableBlankPasswords.reg to disable remote login via blank password.

The trick works on both 32-bit and 64-bit operating systems.

Thursday, January 15, 2009

Windows 7 tips and tricks


Two Microsoft employees have posted helpful Windows 7 tips, tricks and secrets this week.

Tim Sneath has posted 30 secrets/tips on his blog. Some of the highlights include the following:

Get Quick Launch toolbar back
1. Right-click the taskbar, choose Toolbars / New Toolbar
2. In the folder selection dialog, enter the following string and hit OK:
%userprofile%\AppData\Roaming\Microsoft\Internet Explorer\Quick Launch
3. Turn off the "lock the taskbar" setting, and right-click on the divider. Make sure that "Show text" and "Show title" are disabled and the view is set to "small icons".
4. Use the dividers to rearrange the toolbar ordering to choice, and then lock the taskbar again.


Windows Vista taskbar

Right-click on the taskbar and choose the properties dialog. Select the "small icons" checkbox and under the "taskbar buttons" setting, choose "combine when taskbar is full".

Starting explorer from "My Computer"

To do this, navigate to Windows Explorer in the Start Menu (it's in the Accessories folder). Then edit the properties and change the target to read: %SystemRoot%\explorer.exe /root,::{20D04FE0-3AEA-1069-A2D8-08002B30309D}

Old behaviour for Windows Live Messenger

Navigate to C:\Program Files\Windows Live\Messenger\ and set the properties of msnmsgr.exe to Vista compatibility mode. This will place the Messenger icon back in your system tray and remove the 2 annoying tabs on the taskbar.

If you're wondering about the fish in the Windows 7 fish then it's a Betta Fish and also has 7 bubbles to signify Windows 7.

Brandon Paddock has posted a full list of the Winkey combinations for Windows 7 on his blog too.


source: neowin.net

Friday, January 2, 2009

How to Add a shortcut to your desktop

You can create shortcuts on your desktop that enable you to open your favorite files and folders by simply double-clicking your mouse.

To add a shortcut from a file to your desktop

1.

Browse through your My Documents folder, and find the file that you want to create a shortcut to.

2.

Right-click the file that you want to be able to open from your desktop, click Send To, and then click Desktop.

File shortcut menu with Send To – Desktop (create shortcut) selected

You’ll see the shortcut on your desktop.

Note: The shortcut icon has an arrow in the lower-left corner to indicate that it’s a shortcut rather than the actual file. You can open a shortcut just like you would any other file by double-clicking it. However, if you delete the shortcut, you won’t remove the file itself.

Shortcuts as they appear on the desktop

For more information about shortcuts, read Working with icons and shortcuts.

Speed up menu display

Microsoft Windows XP uses many visual effects to provide a rich, friendly interface. One of these settings allows menus to fade into view when you open them. This visual effect is so smooth that you may never have noticed it; however, the effect does cause menus to take a little longer to appear.

On a fast computer, this shouldn't be an issue. But on a computer that isn’t responding as quickly as you'd like, you can make menus display faster.

To speed up menu display

1.

Click Start. Right-click My Computer, and then click Properties.

My Computer shortcut menu with Properties selected

2.

Click the Advanced tab. In the Performance area, click Settings.

System Properties dialog box Advanced tab with Settings button selected

3.

On the Visual Effects tab in the Performance Options dialog box, clear the Fade or slide menus into view check box.

Visual Effects tab in Performance Options dialog box with Fade or slide menus into view selected

4.

Click OK.

5.

In the System Properties dialog box, click OK.

Advanced tab in System Properties dialog box with OK selected

Now when you click a menu, it will appear almost instantly.

How to Navigate menus using the keyboard

You can speed up tasks in almost any program by choosing menu items using your keyboard instead of your mouse. This operation is particularly handy when you're performing repetitive tasks.

To control menus using your keyboard

1.

With your program open, press the ALT key. Notice that one letter on each menu name is now underlined. To open the menu, press the underlined key. For example, in Internet Explorer, the View menu name shows the V underlined after you press the ALT key. To open the View menu, press the ALT key, and then press V.

Menu bar with the V highlighted and underlined on View menu name

2.

Now, each menu item will show one letter underlined. To access or activate the menu item you want, simply press the underlined key. For example, in Internet Explorer, after you open the View menu, the Privacy Report menu item shows the V underlined. Instead of clicking Privacy Report with your mouse, you can just press the V key.

View menu with the v in Privacy Report menu item highlighted and underlined

3.

You can also choose menu commands by pressing key sequences quickly, without waiting for the menus to open. For example, to quickly view a Web page's privacy report in Internet Explorer, press ALT, V, V. Similarly, to save a Web page in Internet Explorer, you would normally click the File menu, and then click Save As. To choose the same commands using your keyboard, press ALT, F, A.

Control windows using your keyboard

If you like to keep four or five windows open while you work (or play) on your computer, you'll appreciate knowing these keyboard shortcuts. You can quickly switch between your Web browser, e-mail, instant message windows, and other programs without taking your hands off the keyboard.

ActionShortcut

Minimize a window to your taskbar

ALT, SPACEBAR, N

Maximize a window so it takes up your whole desktop

ALT, SPACEBAR, X

Restore a window so it's visible but doesn't take up your whole desktop

ALT, SPACEBAR, R

Close a window

ALT+F4

Switch to the last window you had open

ALT+TAB

Switch to any window

Hold down the ALT key, and press TAB until the window you want is active

Programs often start up in a "restored" state, where the window takes up only part of the screen. To maximize the window so that it takes up the entire screen, press the ALT key, press the SPACEBAR, and then press X. This will feel natural after you do it a few times, and you will feel much more efficient while using your computer.

Tired of chasing your mouse? Use keyboard shortcuts

The mouse, one of the greatest advances in computing history, provides you with an intuitive point-and-click method for using your computer. Depending on the type of work you're doing, however, sometimes using a mouse actually slows you down. If you are a good typist, taking your hands away from the keyboard to move the mouse can use up a few seconds. Over the course of a full day, you could save several minutes by using keyboard shortcuts instead of the mouse.

You can use your keyboard instead of your mouse to do these three tasks:

Start a program

Navigate menus

Minimize, maximize, and close windows

Start a program using a keyboard shortcut

The Start menu is great for finding programs, but its multiple levels of folders can be time consuming to navigate. If there is a program you start frequently, you should set a keyboard shortcut for it so that you can start the program without taking your hands off the keyboard.

To set a keyboard shortcut to start a program

1.

Click the Start menu, and then click All Programs. Right-click the program that you want to start with a keyboard shortcut, and then click Properties.

Shortcut menu for a program with Properties selected

2.

Click in the Shortcut key box. Now press the letter on your keyboard that you want to use to start the program. Make it easy to remember—for example, press I for Microsoft Internet Explorer.

Note: You can use either uppercase or lowercase letters when creating your keyboard shortcuts—and when accessing them later. In the Shortcut key box, Microsoft Windows XP automatically adds Ctrl + Alt + before the key you pressed. When you want to start the program, hold down both the CTRL and ALT keys simultaneously, while also pressing the letter you chose. This way, your program won't start every time you type that letter.

Properties window for specified program with Shortcut tab displayed and Shortcut key box indicated

3.

Click OK.

Properties window for specified program with Shortcut tab displayed and OK button selected

4.

Now test your shortcut. Hold down the CTRL and ALT keys, and then press the letter you chose. If you find it difficult to hold down two keys at once, read Turn on the Sticky Keys feature. Your program should start.

Pressing shortcut keys

When your friends see you start up programs without touching your mouse, they just might think you have a psychic connection with your computer!

Simplify using your mouse: change double-click to single-click

When you browse the Web with Microsoft Internet Explorer, links open with a single click. Yet, when you browse My Computer or My Documents, a single click lets you select a file or folder, but you have to double-click to open it.

If you'd rather single-click to open files and folders, you can change the setting on your mouse (don't worry, this process doesn't require any double clicks).

To change the settings on your mouse

1.

Click Start, and then click My Computer.

Start menu with My Computer selected

2.

Click Tools, and then click Folder Options.

Folder Options selected on Tools menu

3.

Click Single-click to open an item. Then, click OK.

General tab in Folder Options dialog box with Single-click to open an item selected

Now you can navigate folders and open files with a single rather than a double click. If you need to select a file, simply hold your mouse over the file for a few seconds without clicking.

Friday, December 12, 2008

How to Copy the I386 source folder to your HD and change the source path

If you installed XP from your CD then whenever it needs a source file (such as when you add an un-installed feature) it will ask you for the CD. You can make life easier if you just copy the I386 source folder from the CD to a partition on your HD.

Follow the next steps:

  1. Open Windows Explorer and navigate to the I386 folder on your installation CD (make sure it's in the drive you moron!).

  2. Right click the I386 folder and choose Copy.

  1. Browse to the partition where you want to copy the files to. I use C:\

  2. Right click the destination partition or folder and select Paste.

Let it finish to copying process. The folder is approximately 482mb in size (can differ depending on your SP version - read the Windows 2000/XP SP Slipstreaming page for more info).

  1. Download THIS zipped file. Extract it and run the enclosed VB script. The script (written by Bill James) will let you change the default path where XP looks for the I386 folder from the original location on the CD to the new destination folder.

Done!

How to Get rid of the MSN Passport creation prompt ?

Windows XP can drive you nuts with the idiotic Passport reminder balloon. If you don't use Microsoft Messenger for your IM needs, or use a different client (see Replace Windows/MSN Messenger for some examples) then you might want to disable that reminder.

  1. Start Registry Editor (Regedit.exe).

Note: As always, before making changes to your registry you should always make sure you have a valid backup. In cases where you're supposed to delete or modify keys or values from the registry it is possible to first export that key or value(s) to a .REG file before performing the changes.

  1. Locate the following key in the registry:

  1. On the Edit menu, click Add Value, and then add the following registry value:

Value Name: PassportBalloon
Value Type: REG_BINARY
Data: 0a (hexadecimal)

Note: 0a as in "zero a" not "oh a"...

  1. Close the registry editor.

How to install Windows 98 after Windows XP?

This procedure assumes that Windows XP is installed on drive C:

Drive C: must be FAT16 or FAT32 to be able to install Windows 98 after XP is already installed. The 98/Me installation routine cannot write to an NTFS partition.

You must have a second hard disk or partition formatted for FAT16/32 in order to be able to install Windows 98/Me.

As always, installing 98/Me to the same partition as Windows XP is Not recommended!

I recommend the use of a Windows 98 Startup disk for this procedure. You should ensure that DEBUG.EXE is on your Startup disk. On a 98 Startup disk, created from Add/Remove Programs, its in the EBD.CAB file on the Startup disk. For a 98 Startup disk created from FAT32EBD.EXE its on the floppy

Installing Windows 98

  1. Use a Win98 Startup disk (with CD support) to boot your computer.

  2. Insert your Win98 CD into the CD Rom drive.

  3. At the A: prompt type X:\Win98\Setup.exe where X: is your CD-ROM drive.

  4. Proceed with the install. When prompted for the install location, you'll see C:\Windows.000. Choose Other directory and change this to the drive you wish to install 98 to and name the folder Windows (or something else if you prefer).

  5. Complete the Win98 install. Allow the computer to boot into Win98.

Repairing the Windows XP Boot Loader

  1. Create a Win98 Startup Disk

  2. Create a Notepad file with the following entries, exactly as shown:

  1. Save the file to the Win98 Startup Disk as READ.SCR

  2. Boot the computer with the Win98 Startup Disk and at the A: prompt type

Steps 1 - 4 create the BOOTSECT.DOS file needed to boot Win98. You may need to use the ATTRIB C:\BOOTSECT.DOS -S -H -R command if BOOTSECT.DOS already exists and you get an error when trying to recreate it.

  1. Configure your computer to boot from the CD drive. This is done in the BIOS, or your computer may offer the option at startup if it detects a bootable CD. If your computer does not support booting from CD-Rom, you should also be able to boot with a 98 Startup disk, and run WINNT.EXE from the I386 folder of your XP CD.

  2. Insert your XP CD and boot from it.

  3. You'll see some files being copied, then you'll be presented with a choice of installing or repairing an existing installation. Choose Repair.

  4. You'll be asked which XP installation you want to log into. Enter 1. There is usually only one installation.

  5. You'll be prompted for the Administrator password. For Home, the default password is blank, so just hit Enter. For Pro, enter the same password you did during setup for the Administrator account (this is not the same as the password for an Admin level account. It must be the Administrator account password).

  6. At the C:\Windows prompt, type FIXBOOT. You'll be prompted to confirm. Do so.

  7. When FIXBOOT is finished, remove the XP CD and type EXIT and the machine will reboot.

  8. Reconfigure your computer to boot from the hard drive if necessary.

You will now get the XP Boot loader with your choice of operating system.

Note: This tip was originally written by Doug Knox.

DupKiller:Kill Duplicate files

One of the biggest space wasters on your hard drive is likely duplicate files. I know I'm notorious for copying the same file to multiple places, promptly forgetting to clean up my mess. Finding duplicates is a lengthy painful process without the help of software to do the heavy lifting. DupKiller effectively seeks out and eliminates duplicates leaving you in control of which dupes to keep and which ones to purge. A standard scan looks for matching file sizes, names and dates to rapidly locate most duplicate files. Better accuracy results from using the content matching mode, which takes considerably longer but tracks down duplicate files that might be named differently while containing the same information. You can customize the duplicate search to eliminate specific files, preview images before deleting and filter on a variety of criteria. [Windows 9x/2k/XP $0.00]

Download DupKiller

Change XP Boot Screen

Depending on which computer manufacturer made your computer, you might have a simple splash screen displayed as the BIOS loads or you might be inundated with advertising throughout the entire boot process. These are two separate image locations requiring editing in multiple places and some confidence in your computing skills, as the BIOS option can potentially damage your system if done incorrectly.

Changing the Windows Boot Screen

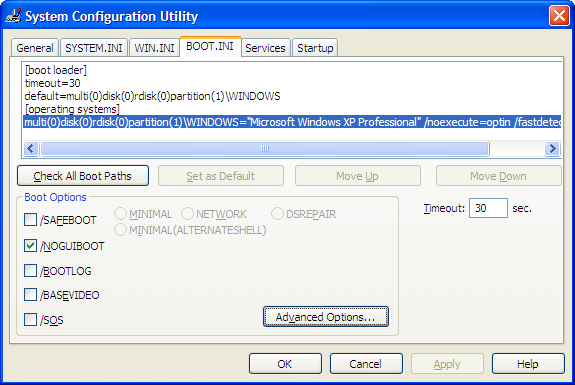
I'll start with the Windows boot screen, since that's fairly easy and doesn't necessarily require any direct modification of system files. There are several ways to approach changing the boot screen. One option is to eliminate it completely, opting to display a blank screen until Windows completes the boot process. To turn off the boot logo, Click Start > Run and type MSCONFIG in the run dialog box to launch the System Configuration Utility. On the BOOT.INI tab, check the box next to /NOGUIBOOT and click OK. The next time you reboot your computer, you'll see the BIOS screen and then nothing until Windows loads completely. The downside to this option is you won't get any feedback if your PC gets hung up somewhere in the boot process.

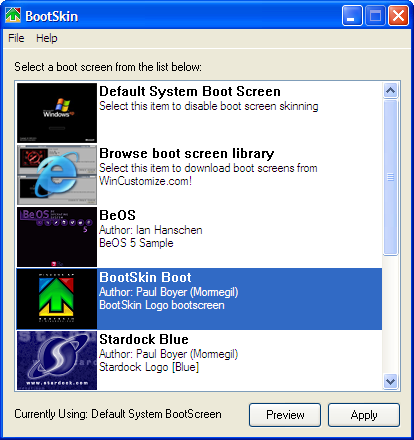
To maintain a more visual boot process, while also eliminating any boot branding, you might simply want to replace the boot image. The easy way to do this is to download a freeware app from WinCustomize called BootSkin. The app automatically overrides the default Windows boot screen, replacing it with one of the many options in the WinCustomize BootSkin library. With some practice you can make your own custom BootSkin as well.


Download BootSkin

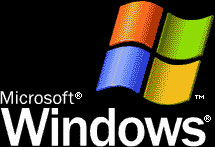
If you want to get really geeky, a third option is to edit the operating system file where the boot screen information resides. You need to be careful in doing this or you can end up with a computer that won't boot. The first part of the process is to create or find an image you want to use. If your computer simply has the all black Windows XP boot screen, with the XP logo like the one pictured below, you don't need a very large image.

Simply create a 215x147 .bmp file with 16 colors (NOT 16-bit) in any image editor and you've got a working replacement. If your computer manufacturer overrides this default screen with something else, you may need to get creative to eliminate all the branding. In general, using a black background looks more consistent, but you can use any of the 16 colors in your palette.

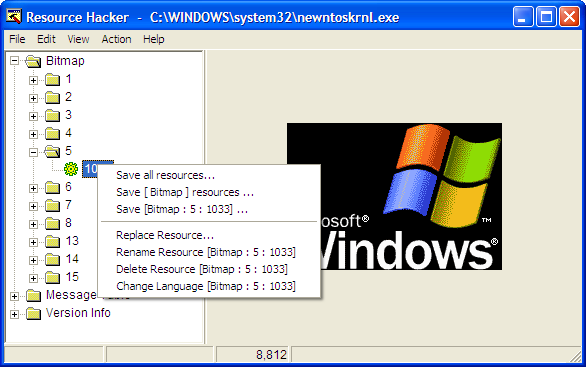
With your new image created, you need a freeware app called Resource Hacker to make some changes.

Before proceeding, locate ntoskrnl.exe in your Windows > system32 folder. Make a copy of the file called newntoskrnl.exe or something equally easy to remember and leave the copy in the system32 folder.

Make a second copy of the ntoskrnl.exe on your desktop (this is the one you will edit).

Open ntoskrnl.exe in Resource Hacker. Expand Bitmap > 5 and highlight the 1033 folder. Right-click the 1033 icon and choose Replace Resource.

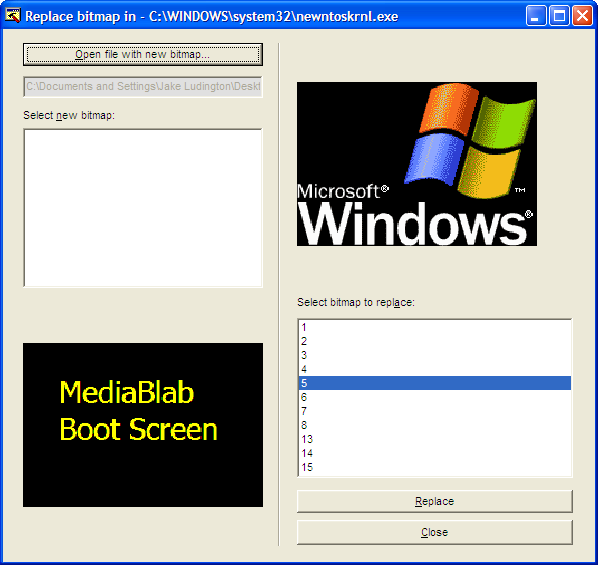
Click the Open file with new bitmap button and locate the image you created earlier. Click the Replace button. Save and exit Resource Hacker. You can optionally replace all elements of the boot screen by editing each portion of the Bitmap.

Reboot into SafeMode and copy your newly created ntoskrnl.exe file into the Windows > system32 folder.

Note: If you are using Windows 2000, you can simply replace the image in the Bitmap > 1 > 1033 location with a 640x480 16 color Bitmap to modify the Win2k boot screen in a similar fashion.

Changing the BIOS Splash Screen

To eliminate the branded splash screen associated with your BIOS, you need to obtain the firmware update for your BIOS and edit the logo file that's part of the BIOS fileset before applying the update. Since every computer model and manufacturer uses a slightly different BIOS configuration, it's important to get the BIOS specific to your computer from the support section of the manufacturer's Website. In some cases, like my HP laptop, it's become virtually impossible to replace the logo because the BIOS flash process is contained in an .exe file that runs locally in Windows rather than from a separate disk.

Assuming your PC manufacturer has you create a floppy designed to flash the PC bios, you can fairly easily make a change to the logo displayed. In following the directions to create the BIOS boot disk, simply replace the included logo.bmp file in the BIOS update package with a logo.bmp file created by you. The key here is to use a 16 color (NOT 16-bit color) 640x480 BMP file. Copy your logo.bmp file onto the disk used for your BIOS update and run the bundled logo.bat file by double-clicking it. This converts the logo.bmp to a format ready for the BIOS update.

It's vital to keep all the files in the BIOS update named exactly as they were or your computer may not work after the update. Any changes made to BIOS update files should be done at your own risk and with extreme care.