Showing posts with label How to. Show all posts

Friday, September 18, 2009

How to customize the Save As dialog box in Windows 7

Simpli Software’s Places Utility allows users to customize the windows ‘Save As’ dialog box.

customize save as

Those who often find themselves browsing through directories in ‘Save As’ dialog to organize their downloads will benefit from this simple program.

Organizing information you download from the Internet (and other files) can be quite a chore.

The standard Save As dialog provides five starting places to save your file: History, My Documents, Desktop, Favorites, and Network.

This program helps you customize these 5 locations easily. You may have to Run it as Administrator. Works on Windows Vista too.

HomePage.

How to password protect use of any application in Windows.

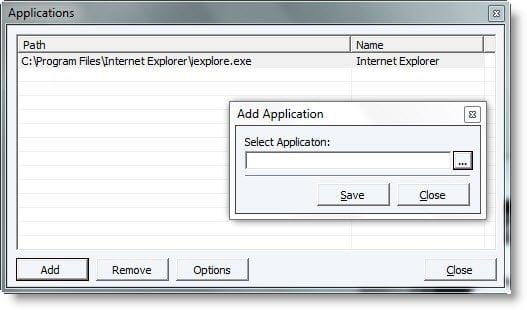
There may be reasons where you may want to restrict use of certain application. While we have already mentioned how you can password protect Internet Explorer natively, here is a way where you can password protect any application, including IE.

desklock


DeskLock is a good freeware utility to password protect applications and open applications using a hotkey. It will detect execution of your listed applications and prompt for a password before continuing.

One can also set hotkeys (eg. CTRL + SHIFT + 1) for most of the features used in the utility. Using a hotkey you can show/close/hide all the applications listed. You can also set a specific hotkey for the different applications, toggling the visibility of the application by pressing the hotkey. For instance, if the application is open then pressing the hotkey will hide it, if the application is closed/hidden then pressing the hotkey will show/run it.

You can also specify if you want to password-protect the application so that you can execute them without prompting for a password if you need it. The initial password is 2.

HomePage | Download.

Sunday, March 1, 2009

How to Upgrade Vista SP1 to Windows 7

Windows Vista Service Pack 1 Release Candidate 1 has been released to Microsoft Connect, MSDN, Technet subscribers, and it’s also available for free download in Windows Update. Because, make no mistake about it, Windows 7 will grow its installed base for the most part to the detriment of its precursors.

Still, the good news is that Microsoft will make available Windows 7 upgrade licenses for both Vista and XP. The price is, of course, a critical factor when considering a jump to the next iteration of Windows, for both those that have coughed up a pretty dollar to upgrade to Vista, and also for the customers that have ridden XP for all its got, skipping the intermediary Windows 6.0 step. The bad news, as far as Windows XP users are concerned, is that Microsoft will not support in-place upgrades from XP to Windows 7. They will need to perform a clean installation of Win 7 on top of XP. Only Vista machines will be able to be upgraded in-place to Windows 7.

In-place upgrades are one of the installation options for Windows operating systems. Microsoft reveals that the process allows users to “install Windows and retain applications, files, and settings as they were in previous edition of Windows.” And fact is that, in the context in which users have gathered a consistent volume of programs along with extensive customization, in-place upgrades make all the sense in the world, especially in scenarios in which re-installing all applications after a clean deployment of Windows would take in excess of a couple of hours. This because the upgrading process is completely automatic, following the initial steps that the end-user has to perform manually.

Essentially, upgrading to Windows 7 is a way to ensure that the operating system does all the heavy lifting, and, even if it is indeed a time-consuming process, stretching at least three or even four times as much as a clean install, the actual effort on behalf of the end-user is minimal.

Monday, February 9, 2009

How to Install and Enable Remote Desktop in Windows XP Home Edition

Windows XP Home Edition (HE) does not come with or support Remote Desktop, or Terminal Services feature. There is Remote Desktop Connection (RDC) client which allows user to connect to remote host, but now accepting any remote desktop connection to the Windows XP Home PC. However, there is way to install and enable Remote Desktop Protocol (RDP) in Windows XP using the trick below.

Note that if you just want to be able to remote control the desktop of the computer running on Windows XP Home Edition, it may be easier and wiser to use the free VNC as alternative instead. One such VNC server and client is UltraVNC.

To run Remote Desktop Terminal Services (server component) in Windows XP Home Edition, the operating system must first made to recognize itself as Windows XP Professional Edition. To do so, follow the guide to convert Windows XP Home to Windows XP Professional.

Read More..

How to Convert and Upgrade Windows XP Home to Professional Without Reinstalling

After installing Windows XP Home Edition or Windows XP Professional Edition onto a computer, officially it’s impossible for user to convert, or upgrade from Windows XP Home to Pro edition, or downgrade from Windows XP Professional to Home edition without reformatting and reinstalling the operating system from clean and fresh state.

A lot of people always associate conversion of Windows XP edition to illegitimate or privacy reason, but sometimes, there may be legitimate and genuine reason for change, such as customer, who all the while using Windows XP Home Edition (HE) finally buy a genuine license product key for Professional edition to replace the illegal pirated version installed, or user receives additional license as gift, but don’t want to go through clean install Windows XP again, or want to keep using the computer with all data intact without interruption.

Here’s a trick to convert and turn Windows XP Home Edition to Windows XP Pro Edition, from within the operating system without going through installation again.

Read More...

Wednesday, January 21, 2009

Installing Windows 7 on any Netbook

When we reviewed the Windows 7 beta, we did so on a standard desktop machine. However, the big thing in hardware right now is not the desktop, but the netbook segment. Since Microsoft claims that Windows 7 is geared towards netbooks, I decided to give the beta a go on my trusty Acer Aspire One. Read on for installation instructions if you don't own an external DVD drive, and a few very short first impressions.

Installation

Installing Windows on a machine without a CD/DVD drive has always been a bit tricky, and you'd think that "geared towards netbooks" would imply that Microsoft made this process a little easier. Well, they didn't, so you'll still have to resort to some tedious work before you can actually start the installation. It's hard to screw this up, but it's still tedious work, and shouldn't really be necessary in this day and age. The instructions below are taken from garyshort.org.

Get yourself a nice USB drive, at least 4GB in size (2GB is too small, and I'm not sure if 3GB drives exist), and plug it in your computer. Then, load up a command prompt with administrative privileges (right click, "Run as administrator..."), and enter the following commands to properly format the USB drive:

diskpart [launches diskpart]
list disk [lists the currently mounted disks, and assigns them a number]
select disk # [selects the USB drive, replace # with your disk's number]
clean [removes any MBR and partition information]
create partition primary [creates primary partition]
select partition 1 [selects the just-created partition]
active [marks the partition as active]
format fs=NTFS [formats the partition as NTFS]
assign [mounts the partition and assigns a drive letter]
exit [terminates diskpart]

The next step is to prepare the bootsector of the USB drive so that it is capable of catapulting the Windows 7 installation routine. To do this, put the Windows 7 DVD in your drive (or mount the .iso image using your tool of choice), and navigate to the /boot directory using a command prompt with administrative privileges. For some weird reason, the prompt I still had running after ceating/formatting the partition on the USB drive no longer had administrative privileges, so I had to load another. Once you're in the boot directory, execute the following command:

bootsect /nt60 # [prepares the boot sector, replace # with your USB drive's drive letter]

The rest is pretty easy. Copy the contents of the Windows 7 DVD/.iso image onto the USB drive. You can do this via drag/drop in Explorer. Once the copy process is complete, you can boot from the USB drive straight into the Windows 7 installation routine as if was a regular bootable DVD. On the Aspire One, this means hitting F12 during boot, invoking the boot menu, and selecting the USB drive as the boot device. Make sure that as soon as the installation routine starts rebooting, that you do not re-launch the installation routine.

That's all there is to it. Tedious, but if you're reading OSNews, this shouldn't pose any problems.

And now what...?

source: http://www.osnews.com/

Thursday, January 15, 2009

How to Install and Enable DreamScene in Windows 7

Windows DreamScene, a feature which allows a video clip, movie show, slideshow or animated image and picture to be set as the desktop background in Windows Vista has been removed in Windows 7, in favor of Desktop Slideshow wallpaper auto rotator. Although Windows 7 no longer supports DreamScane, the DreamScene function can still be manually added and installed into Windows 7 with a little hack in order to turn on and enable the DreamScene support in Windows7.

In order to enable DreamScene in Windows 7, the similar hack which allows DreamScene to be installed on non-Ultimate edition of Windows Vista such as Windows Vista Home Basic, Home Premium, Business and Enterprise edition is used. The DreamScene installation hack has been compiled into an executable, which automatically copy the necessary DreamScene files and merge require registry keys and entries.

Tip: To run DreamScene in Windows 7, Windows Aero has to be turned on.

How to Install DreamScene in Windows 7
Run the Windows7-DreamScene.exe as Administrator to install and enable Windows DreamScene on Windows 7. The installer will copy DreamScene.dll to %WinDir%\System32 folder, DreamScene.dll.mui to %WinDir%\System32\en-US folder and add the required registry keys and values. Then it will automatically restart the Explorer to make the installation of DreamScene works immediately.

A Windows DreamScene folder has also been created in %WinDir%\Web\ folder. You can place any video file that you want to set as DreamScene background wallpaper here as in Windows Vista, or anywhere you like. However, the folder is less useful as Windows 7 does not support direct viewing of video or animated media in Personalization Control Panel.

Download:
Windows7-DreamScene.exe (link 1)
Windows7-DreamScene.exe (link 2)

source: mydigitallife.info

Friday, January 2, 2009

How to Add a shortcut to your desktop

You can create shortcuts on your desktop that enable you to open your favorite files and folders by simply double-clicking your mouse.

To add a shortcut from a file to your desktop

1.

Browse through your My Documents folder, and find the file that you want to create a shortcut to.

2.

Right-click the file that you want to be able to open from your desktop, click Send To, and then click Desktop.

File shortcut menu with Send To – Desktop (create shortcut) selected

You’ll see the shortcut on your desktop.

Note: The shortcut icon has an arrow in the lower-left corner to indicate that it’s a shortcut rather than the actual file. You can open a shortcut just like you would any other file by double-clicking it. However, if you delete the shortcut, you won’t remove the file itself.

Shortcuts as they appear on the desktop

For more information about shortcuts, read Working with icons and shortcuts.

How to Navigate menus using the keyboard

You can speed up tasks in almost any program by choosing menu items using your keyboard instead of your mouse. This operation is particularly handy when you're performing repetitive tasks.

To control menus using your keyboard

1.

With your program open, press the ALT key. Notice that one letter on each menu name is now underlined. To open the menu, press the underlined key. For example, in Internet Explorer, the View menu name shows the V underlined after you press the ALT key. To open the View menu, press the ALT key, and then press V.

Menu bar with the V highlighted and underlined on View menu name

2.

Now, each menu item will show one letter underlined. To access or activate the menu item you want, simply press the underlined key. For example, in Internet Explorer, after you open the View menu, the Privacy Report menu item shows the V underlined. Instead of clicking Privacy Report with your mouse, you can just press the V key.

View menu with the v in Privacy Report menu item highlighted and underlined

3.

You can also choose menu commands by pressing key sequences quickly, without waiting for the menus to open. For example, to quickly view a Web page's privacy report in Internet Explorer, press ALT, V, V. Similarly, to save a Web page in Internet Explorer, you would normally click the File menu, and then click Save As. To choose the same commands using your keyboard, press ALT, F, A.

Control windows using your keyboard

If you like to keep four or five windows open while you work (or play) on your computer, you'll appreciate knowing these keyboard shortcuts. You can quickly switch between your Web browser, e-mail, instant message windows, and other programs without taking your hands off the keyboard.

ActionShortcut

Minimize a window to your taskbar

ALT, SPACEBAR, N

Maximize a window so it takes up your whole desktop

ALT, SPACEBAR, X

Restore a window so it's visible but doesn't take up your whole desktop

ALT, SPACEBAR, R

Close a window

ALT+F4

Switch to the last window you had open

ALT+TAB

Switch to any window

Hold down the ALT key, and press TAB until the window you want is active

Programs often start up in a "restored" state, where the window takes up only part of the screen. To maximize the window so that it takes up the entire screen, press the ALT key, press the SPACEBAR, and then press X. This will feel natural after you do it a few times, and you will feel much more efficient while using your computer.

Tired of chasing your mouse? Use keyboard shortcuts

The mouse, one of the greatest advances in computing history, provides you with an intuitive point-and-click method for using your computer. Depending on the type of work you're doing, however, sometimes using a mouse actually slows you down. If you are a good typist, taking your hands away from the keyboard to move the mouse can use up a few seconds. Over the course of a full day, you could save several minutes by using keyboard shortcuts instead of the mouse.

You can use your keyboard instead of your mouse to do these three tasks:

Start a program

Navigate menus

Minimize, maximize, and close windows

Start a program using a keyboard shortcut

The Start menu is great for finding programs, but its multiple levels of folders can be time consuming to navigate. If there is a program you start frequently, you should set a keyboard shortcut for it so that you can start the program without taking your hands off the keyboard.

To set a keyboard shortcut to start a program

1.

Click the Start menu, and then click All Programs. Right-click the program that you want to start with a keyboard shortcut, and then click Properties.

Shortcut menu for a program with Properties selected

2.

Click in the Shortcut key box. Now press the letter on your keyboard that you want to use to start the program. Make it easy to remember—for example, press I for Microsoft Internet Explorer.

Note: You can use either uppercase or lowercase letters when creating your keyboard shortcuts—and when accessing them later. In the Shortcut key box, Microsoft Windows XP automatically adds Ctrl + Alt + before the key you pressed. When you want to start the program, hold down both the CTRL and ALT keys simultaneously, while also pressing the letter you chose. This way, your program won't start every time you type that letter.

Properties window for specified program with Shortcut tab displayed and Shortcut key box indicated

3.

Click OK.

Properties window for specified program with Shortcut tab displayed and OK button selected

4.

Now test your shortcut. Hold down the CTRL and ALT keys, and then press the letter you chose. If you find it difficult to hold down two keys at once, read Turn on the Sticky Keys feature. Your program should start.

Pressing shortcut keys

When your friends see you start up programs without touching your mouse, they just might think you have a psychic connection with your computer!

Thursday, December 25, 2008

How to Install Windows 7 or Windows Vista on Physical Machine Without DVD Media

A lot of Windows Vista and Windows 7 license has been sold media-less nowadays, where buyers only receive a piece of authenticated certificate with a genuine and legitimate product key printed on it.

For user who doesn’t want to waste a DVD disc to burn the ISO to physical media, and does not have WinPE (Windows PE) startup disc, here’s a workaround method to install Windows Vista and Windows 7 into physical computer’s hard disk drive or partition (volume) directly with ISO without writing or burning to disc. The without-disc installation method is useful especially during beta and RC period of new operating system in the making, where the new build and new version is launching and publishing every now and then. This tutorial guide assumes that the new Windows 7 or Windows Vista will be installed and replaced the original existing operating system currently installed. The instructions can be modified slightly (mainly on hard disk partition used) to fit into need of readers who want to have a dual-boot, multi-boot, or simply just to upgrade install to new OS.

1. Install a virtual CD/DVD drive on existing Windows operating system.
2. Mount the Windows Vista or Windows 7 installation DVD ISO image using the virtual drive.
3. Copy all files inside the virtual CD/DVD drive mounted with the ISO into any folder on any partition or hard disk drive not going to be used to install the Windows OS. For example, copy into E:\Windows7.
4. Copy the bootmgr and boot folders nested inside the copied folder (i.e. \Windows7) to root directory of system boot drive, typically C:\.

Note: For Windows Vista, users may need to use this step: Copy the bootmgr folder from E:\Windows7 to C:\ root directory, copy E:\Windows7\boot\boot.sdi file to same folder in C:\boot folder, and then copy bootsect.exe from the E:\Windows7\boot\ folder to C:\ drive.

Note: boot folder in system boot drive is hidden system folder.
5. Create a new folder named sources under the C:\ root folder.
6. Copy the boot.win file inside \Windows7\sources folder to the source folder created in the system boot drive, normally C:\.
7. Open a command prompt as administrator.
8. Run the following command (change the C to your drive path letter if applicable):

C:\boot\bootsect.exe /nt60 C:

For Windows Vista users who copied bootsect.exe to C:\ root folder, use the following command instead:

C:\bootsect.exe /nt60 C:


A successful message is the command completes successfully.
9. Change the name or label of the boot system partition local disk to BDCP or any name you prefer that easier to remember and type (in DOS command promot, use label command).
10. Restart the computer.
11. After booting up, the system will start the corresponding Windows installation process. Select the applicable language to install, time and currency format (regional settings locale) and keyboard or input method in the installation wizard dialog.
12. On the next screen, user will be presented with option to Install Windows. DO NOT press on Install Windows button, instead, click on Repair My Computer link on the bottom left corner.
13. In the Windows Recovery Environment (WinRE) System Recovery Options dialog window, click on Command Prompt to open a DOS Prompt window.
14. Run the format command to format the primary hard disk or partition to clean state:

format c: /q

Note: /q switch, which perform quick format can be omitted to full format. And if existing hard disk partition is of FAT32 filesystem format, use format c: /q /fs:ntfs to convert the file system to NTFS while formatting. Before formatting begins, the command may prompt for hard disk drive or partition label name, if so, enter accordingly (i.e. BDCP).
15. After format completed, start the Windows Vista or Windows 7 installation process again by manually running the setup.exe located in the copied. Note that the setup.exe is not the one located on boot system drive which copied at later step, as the boot drive has been formatted. For example:

E:\Windows7\sources\setup.exe
16. Continue with installation procedures by following on-screen instructions as per normal practice.

source: mydigitallife.info

Friday, December 12, 2008

How to Configure IE to download more than 2 concurrent files

IE 6 has a nasty habit of preventing us from downloading more than 2 files at once. Sounds idiotic? Believe it or not, it's true! To configure IE to allow up to 10 simultaneous downloads (it only allows 2 at a time) do the following:

  1. Open Registry Editor.

  2. In Registry Editor, navigate to the following registry key:

  1. On the Edit menu, click Add Value, and then add the following registry value:

    "MaxConnectionsPer1_0Server"=Dword:0000000a
    "MaxConnectionsPerServer"=Dword:0000000a

    You can change 0000000a to any other value as long as it's hexadecimal.

  2. Close the registry editor.

Download THIS zipped file and double click it's contents to merge it to your registry. The file will allow for a maximum of 10 simultaneous downloads.

How to Copy the I386 source folder to your HD and change the source path

If you installed XP from your CD then whenever it needs a source file (such as when you add an un-installed feature) it will ask you for the CD. You can make life easier if you just copy the I386 source folder from the CD to a partition on your HD.

Follow the next steps:

  1. Open Windows Explorer and navigate to the I386 folder on your installation CD (make sure it's in the drive you moron!).

  2. Right click the I386 folder and choose Copy.

  1. Browse to the partition where you want to copy the files to. I use C:\

  2. Right click the destination partition or folder and select Paste.

Let it finish to copying process. The folder is approximately 482mb in size (can differ depending on your SP version - read the Windows 2000/XP SP Slipstreaming page for more info).

  1. Download THIS zipped file. Extract it and run the enclosed VB script. The script (written by Bill James) will let you change the default path where XP looks for the I386 folder from the original location on the CD to the new destination folder.

Done!

How to Restore my Desktop icons!..?

XP hides you regular desktop icons. I don't know why, but some sick mind in Seattle thought that a desktop without Internet Explorer, My Computer, My Documents and the My Network Places icons looks nicer.

I don't.

So I want to get them back.

Follow the next steps:

  1. Right-click an empty space on your desktop. Choose Properties.

  1. In the Display Properties window go to the Desktop tab and click the Customize Desktop button.

  1. In the Desktop Icons section click to select all the icons you want.

  1. Click Ok all the way out.

  2. Your icons are back.

How to Get rid of the MSN Passport creation prompt ?

Windows XP can drive you nuts with the idiotic Passport reminder balloon. If you don't use Microsoft Messenger for your IM needs, or use a different client (see Replace Windows/MSN Messenger for some examples) then you might want to disable that reminder.

  1. Start Registry Editor (Regedit.exe).

Note: As always, before making changes to your registry you should always make sure you have a valid backup. In cases where you're supposed to delete or modify keys or values from the registry it is possible to first export that key or value(s) to a .REG file before performing the changes.

  1. Locate the following key in the registry:

  1. On the Edit menu, click Add Value, and then add the following registry value:

Value Name: PassportBalloon
Value Type: REG_BINARY
Data: 0a (hexadecimal)

Note: 0a as in "zero a" not "oh a"...

  1. Close the registry editor.